created: 2017/01/11
updated: 2017/01/24
As a learning exercise I was interested in building a minimal linux system. Based on a little net surfing, this appears to be a fairly popular past time. With a little help from Mr Google it seems the easiest way to do this is using the BusyBox toolkit and the qemu (Quick Emulator).
The document will review booting a minimal system using three approaches:
The qemu emulator:
QEMU (short for Quick Emulator) is a free and open-source hosted hypervisor that performs hardware vitalization. QEMU can be used purely for CPU emulation or it can emulate a full computer system, including peripherals.
BusyBox is an application that has 300+ unix commands in a single executable.
From the BusyBox web site:
BusyBox combines tiny versions of many common UNIX utilities into a single small executable. It provides replacements for most of the utilities you usually find in GNU fileutils, shellutils, etc. The utilities in BusyBox generally have fewer options than their full-featured GNU cousins; however, the options that are included provide the expected functionality and behave very much like their GNU counterparts. BusyBox provides a fairly complete environment for any small or embedded system.
The BusyBox build process creates a single executable application /bin/busybox which a gaggle of symbolic links. If you execute busybox via one of the link, sh or cat for example, it will behave as that application. Very useful to have one application provide most of the basic unix tools.
Here is a sample of the busybox applications:
$ ll bin
    total 2.4M
    lrwxrwxrwx 1 john    7 Jan 12 10:35 ash -> busybox
    lrwxrwxrwx 1 john    7 Jan 12 10:35 base64 -> busybox
    -rwxr-xr-x 1 john 2.4M Jan 12 10:35 busybox
    lrwxrwxrwx 1 john    7 Jan 12 10:35 cat -> busybox
    lrwxrwxrwx 1 john    7 Jan 12 10:35 catv -> busybox
    lrwxrwxrwx 1 john    7 Jan 12 10:35 chattr -> busybox
    lrwxrwxrwx 1 john    7 Jan 12 10:35 chgrp -> busybox
    lrwxrwxrwx 1 john    7 Jan 12 10:35 chmod -> busybox
    lrwxrwxrwx 1 john    7 Jan 12 10:35 chown -> busybox
    lrwxrwxrwx 1 john    7 Jan 12 10:35 conspy -> busybox
    lrwxrwxrwx 1 john    7 Jan 12 10:35 cp -> busybox
    lrwxrwxrwx 1 john    7 Jan 12 10:35 cpio -> busybox
To build a minimal linux system we will need to install the qemu package, build the Busybox toolkit, build the Linux kernel and build the kernels early user space file system (initramfs).
In other words, compile two applications and create one cpio archive.
FYI: I developed and ran these exercises with Slackware 14.2 running on an VirtualBox VM. It is also worth noting that I am using a 64 version of slackware and gcc.
$ inxi -v 3
System:    Host: slackvm.slack.vm Kernel: 4.4.38 x86_64 (64 bit gcc: 5.4.0)
           Desktop: Fluxbox 1.3.7 Distro: Slackware 14.2
Machine:   Device: virtualbox System: innotek product: VirtualBox v: 1.2
           Mobo: Oracle model: VirtualBox v: 1.2
BIOS: innotek v: VirtualBox date: 12/01/2006You can download buysbox from their website https://busybox.net/
The busybox build system supports O= means “place build output here”. This allows you to host multiple different configurations out of the same source tree. The Linux kernel follows a similar convention. We can start the system build with the default configuration:
$ cd $HOME/tiny/busybox-1.26.2/
$ mkdir -pv bb_build
$ make O=bb_build defconfig
We need to statically link busybox in order to avoid fiddling with shared libraries. To do this we need to use busybox’s menuconfig interface to enable static linking:
$ make O=../obj/busybox-x86 menuconfig

-> Busybox Settings
  -> Build Options
    [ ] Build BusyBox as a static binary (no shared libs)
        (select this item, save the configuration, exit)
Compile busybox:
$ cd bb_build
$ make
$ make install
With this done, the bb_build/_install directory will have a directory structure with all the unix tools. You will find bin, sbin, and usr/bin and user/sbin directories with all the associated unix commands/tools. These tools will form the core of the kernels initramfs.
Like the busybox build the kernel has the O=some_directory option to build multiple configurations off the same source tree. I built the kernel with the default configuration, as it would take you 35 years to figure out all the possible configuration options.
$ cd $HOME/tiny/linux-4.9.2/
$ mkdir build1
$ make O=build1 defconfig
$ cd build1
$ makeWhen I looked into creating the initramfs things started to become very confusing. The sites that detailed the linux boot process often refered to initrd instead of initramfs. When I started to look at the dates of these sites that it became clear initrd is old and initramfs is the new method.
The short version is that initramfs is the replacement for initrd. It is a cpio ("copy in and out") archive of the initial file system that gets loaded into memory during the Linux startup process.
Here is a longer version of initrd vs initramfs:
The initrd (initial ramdisk) is a scheme for loading a temporary root file system into memory, which may be used as part of the Linux startup process. initrd and initramfs refer to two different methods of achieving this. Both are commonly used to make preparations before the real root file system can be mounted.
An image of this initial root file system (along with the kernel image) must be stored somewhere accessible by the Linux bootloader or the boot firmware of the computer. The bootloader will load the kernel and initial root file system image into memory and then start the kernel, passing in the memory address of the image. At the end of its boot sequence, the kernel tries to determine the format of the image from its first few blocks of data, which can lead either to the initrd or initramfs scheme.
In the initrd scheme, the image may be a file system image (optionally > compressed), which is made available in a special block device (/dev/ram) that is then mounted as the initial root file system.[3] The driver for that file system must be compiled statically into the kernel. Many distributions originally used compressed ext2 file system images. Once the initial root file system is up, the kernel executes /linuxrc as its first process, when it exits, the kernel assumes that the real root file system has been mounted and executes /sbin/init to begin the normal user-space boot process.
In the initramfs scheme (available since the Linux kernel 2.6.13), the image is a cpio archive (optionally compressed). The archive is unpacked by the kernel into a special instance of a tmpfs that becomes the initial root file system. This scheme has the advantage of not requiring an intermediate file system or block drivers to be compiled into the kernel. In the initramfs scheme, the kernel executes /init as its first process that is not expected to exit.
The initramfs build process will be to:
Here are the commands to build the directories and unix tools:
$ cd $HOME/tiny/
$ mkdir exercise1/
$ mkdir exercise1/initramfs
$ cd exercise1/initramfs
$ mkdir etc
$ mkdir proc
$ mkdir sys
$ cp -av $HOME/tiny/busybox-1.26.2/bb_build/_install/* .
$ ls -al
    total 32
    drwxr-xr-x 8 john users 4096 Jan 20 12:01 .
    drwxr-xr-x 3 john users 4096 Jan 20 12:00 ..
    drwxr-xr-x 2 john users 4096 Jan 20 11:33 bin
    drwxr-xr-x 2 john users 4096 Jan 20 12:00 etc
    lrwxrwxrwx 1 john users   11 Jan 20 11:33 linuxrc -> bin/busybox
    drwxr-xr-x 2 john users 4096 Jan 20 12:00 proc
    drwxr-xr-x 2 john users 4096 Jan 20 11:33 sbin
    drwxr-xr-x 2 john users 4096 Jan 20 12:00 sys
    drwxr-xr-x 4 john users 4096 Jan 20 11:33 usr
$ rm linuxrc
    (we do not need this, as we are using intitramfs not initrd)
Create the init script. It is a simple shell script.
$ vim init
        (i - insert)
    #!/bin/sh
    mount -t proc none /proc
    mount -t sysfs none /sys
    echo -e "Hello World\n"
    exec /bin/sh
        (:wq - write, quit)
and make it executable:
$ chmod +x initWe’re now ready to cpio everything:
$ find . -print0 | cpio --null -ov --format=newc  > initramfs.cpio
$ cd ..
$ cp linux-4.9.2/build1/arch/x86_64/boot/bzImage .
$ cp initramfs/initramfs.cpio .
$ ll
    total 12M
    -rw-r--r-- 1 john 6.4M Jan 20 12:06 bzImage
    drwxr-xr-x 8 john 4.0K Jan 20 12:05 initramfs
    -rw-r--r-- 1 john 4.8M Jan 20 12:06 initramfs.cpio
That is it. We have the kernel (bzImage) and the initramfs (initramfs.cpio) so we are ready to try out a virutal boot.
PS: we could also have created the initramfs as a compressed archive using gzip:
$ find . -print0 | cpio --null -ov --format=newc |
gzip -9 > initramfs.cpio.gzThe qemu system has options to boot the kernel directly without the need for a bootloader.
qemu-system-x86_64 -kernel bzImage -initrd initramfs.cpio -m 512I found that sometimes the kernel would panic so some APIC power management gunk. We can boot without APIC by setting a kernel parameter via the append option.
qemu-system-x86_64 -kernel bzImage -initrd initramfs.cpio -m 512 -append noapicAnd, finally if you want it to boot on your terminal instead of a separate screen you can tell the kernel to use ttyS0.
qemu-system-x86_64 -kernel bzImage -initrd initramfs.cpio -m 512 -nographic -append console=ttyS0In the boot messages we can see the Hello World message from the initramfs and the shell prompt "#" from the /bin/sh program.
 [    1.471303] console [netcon0] enabled
 [    1.471303] netconsole: network logging started
 [    1.471303] ALSA device list:
 [    1.471303]   No soundcards found.
 [    1.530379] Freeing unused kernel memory: 1144K (ffffffff81f34000 - ffffffff82052000)
 [    1.531070] Write protecting the kernel read-only data: 14336k
 [    1.531070] Freeing unused kernel memory: 1020K (ffff880001901000 - ffff880001a00000)
 [    1.551927] Freeing unused kernel memory: 1288K (ffff880001cbe000 - ffff880001e00000)
 Hello World
 [    1.591135] random: fast init done

 /bin/sh: cant access tty; job control turned off
 / # [    1.985228] input: ImExPS/2 Generic Explorer Mouse as /devices/platform/i8042/serio1/input/input3
 [    2.449862] clocksource: Switched to clocksource tsc

/ # <----- BASH PROMPT... YEAH!!!!In the version we will create an initramfs system that mounts a hard drive (virtual hard disk) and switches the root filesystem over to it.
Since the busybox toolset is only 2.4MB, we do not need a huge disk image for this exercise. I started with 100MB disk image.
$ dd if=/dev/zero of=disk.image bs=1M count=100

# losetup /dev/loop0 disk.img
# fdisk /dev/loop0
    o - for DOS type
    n - for new partition (defaults.... p 1 2048 204799)
    a - for bootable
    p - for print
        Disk /dev/loop0: 100 MiB, 104857600 bytes, 204800 sectors
        Units: sectors of 1 * 512 = 512 bytes
        Sector size (logical/physical): 512 bytes / 512 bytes
        I/O size (minimum/optimal): 512 bytes / 512 bytes
        Disklabel type: dos
        Disk identifier: 0xcdf3e52a

        Device       Boot Start    End Sectors Size Id Type
        /dev/loop0p1 *     2048 204799  202752  99M 83 Linux
    w - for write

# losetup -d /dev/loop0
# losetup -o 1048576 /dev/loop0 disk.img
# mkfs -t ext4 /dev/loop0
# losetup -d /dev/loop0
..
At this point we have a empty virtual disk with an ext4 filesystem starting 2048 disk blocks into the file. Now we need to gather all the files necessary for a minimal root file system.
$ cd $HOME/tiny/exercise2
$ mkdir rootfs
$ cp -R $HOME/tint/busybox-1.26.2/bb_build/_install/* rootfs/
$ cd rootfs
$ rm linuxrc
$ ls -al
    total 20
    drwxr-xr-x 5 john users 4096 Jan 13 15:14 .
    drwxr-xr-x 3 john users 4096 Jan 13 15:14 ..
    drwxr-xr-x 2 john users 4096 Jan 13 15:13 bin
    drwxr-xr-x 2 john users 4096 Jan 13 15:13 sbin
    drwxr-xr-x 4 john users 4096 Jan 13 15:12 usr
$ mkdir etc
$ mkdir proc
$ mkdir sys
$ mkdir dev
$ mkdir boot
$ cp $HOME/tiny/linux-4.9.2/build1/arch/x86_64/boot/bzImage boot/
..
This file system still needs an inittab and the init startup scripts. And, we will need a initramfs to mount this root file system and start the init program.
First the inittab ...
According to the busybox documentation you do not really need this as busybox has a default to run init.d/rc.S on startup. However I created a simple inittab just because.
$ cat inittab
    # Note: BusyBox init works just fine without an inittab. If no inittab is
    # found, it has the following default behavior:
    #         ::sysinit:/etc/init.d/rcS
    #         ::askfirst:/bin/sh
    #         ::ctrlaltdel:/sbin/reboot
    #         ::shutdown:/sbin/swapoff -a
    #         ::shutdown:/bin/umount -a -r
    #         ::restart:/sbin/init
    #         tty2::askfirst:/bin/sh
    #         tty3::askfirst:/bin/sh
    #         tty4::askfirst:/bin/sh
    #
    # Boot-time system configuration/initialization script.
    # This is run first except when booting in single-user mode.
    #
    ::sysinit:/etc/init.d/rc.S
The above inittab simply calls on script on start up: /etc/init.d/rc.S
The rc.S is very simple, call mdev to setup the /dev directory and associated devices then execute a shell.
$ cat rc.S
    #!/bin/sh
    echo -e "\n\n\n>>root directory"
    ls

    mdev -s

    echo -e  "\n\n>>Hello World"
    exec /bin/sh
Let install these file into the root file system then copy the whole thing onto the virtual disk image.
# chmod 755 rc.S
# mkdir rootfs/etc/init.d
# cp rc.S rootfs/etc/init.d/
# cp inittab  rootfs/etc

# mkdir mnt
# mount -t ext4 -o loop -o offset=1048576 disk.img mnt
# cp -R rootfs/* mnt/
# umount mntLast step is to build the initramfs to mount the virtual disk image as a disk and switch the root file system to it.
$ cd $HOME/tiny/exercise2/
$ mkdir initramfs
$ cd initramfs
$ mkdir {etc,proc,sys}
$ cp -av $HOME/tiny/busybox-1.26.2/bb_build/_install/* .
$ rm linuxrc


$ vim init

    #!/bin/sh
    #
    # 2017/01/11 created

    mount -t proc none /proc
    mount -t sysfs none /sys
    mount -t tmpfs /dev /dev

    echo -e  "\n\n>> initramfs running"
    sleep 1

    # find all devices
    mdev -s
    sleep 2

    # find and mount the new filesystem.
    mkdir /newroot
    mount -t ext4 /dev/sda1 /newroot

    # Move the OS filesystems into newroot
    mount --move /sys /newroot/sys
    mount --move /proc /newroot/proc
    mount --move /dev /newroot/dev

    # Now switch to the new filesystem
    # and run /sbin/init out of it
    # Do not forget to "exec" here,
    # we want the new init program to inherit PID 1

    exec switch_root /newroot /sbin/init

$ chmod 755 init
$ find . -print0 | cpio --null -ov --format=newc  > initramfs.cpio
$ mv initramfs/initramfs.cpio ..Now we need a copy of the kernel.
$ cd $HOME/tiny/exercise2
$ cp linux-4.9.2/build1/arch/x86_64/boot/bzImage .
Thats it. We have the kernel, the new initramfs, and the virtual disk.
$ ll
total 26M
-rw-r--r-- 1 john 6.4M Jan 22 09:10 bzImage <---- the kernel
-rw-r--r-- 1 john 100M Jan 21 13:54 disk.img <------ virtual disk with root filesytstem
-rwxr-xr-x 1 john  610 Jan 22 08:55 init
drwxr-xr-x 7 john 4.0K Jan 22 09:07 initramfs
-rw-r--r-- 1 john 4.8M Jan 22 09:06 initramfs.cpio  <---- early user space file system
-rw-r--r-- 1 john  579 Jan 21 13:52 inittab
drwxr-xr-x 2 root 4.0K Jan 21 13:53 mnt
-rwxr-xr-x 1 john   99 Jan 21 13:48 rc.S
drwxr-xr-x 9 john 4.0K Jan 21 13:48 rootfsThe qemu command is very similar to exerecise #1 but with the addition of the -hda option to specify the virtural disk image.
qemu-system-x86_64 -kernel bzImage -initrd initramfs.cpio -m 512 \
-hda disk.img -nographic -append console=ttyS0 Below is the tail end of the boot message output:
[ 1.640225] Write protecting the kernel read-only data: 14336k
[ 1.640225] Freeing unused kernel memory: 1020K (ffff880001901000 - ffff880001a00000)
[ 1.660033] Freeing unused kernel memory: 1288K (ffff880001cbe000 - ffff880001e00000)
[ 1.680152] random: fast init done
>> initramfs running
[ 2.100436] input: ImExPS/2 Generic Explorer Mouse as /devices/platform/i8042/serio1/input/input3
[ 2.537622] clocksource: Switched to clocksource tsc
[ 5.050102] EXT4-fs (sda1): recovery complete
[ 5.054046] EXT4-fs (sda1): mounted filesystem with ordered data mode. Opts: (null)
[ 5.056819] mount (973) used greatest stack depth: 13984 bytes left
[ 5.075192] mount (978) used greatest stack depth: 13616 bytes left
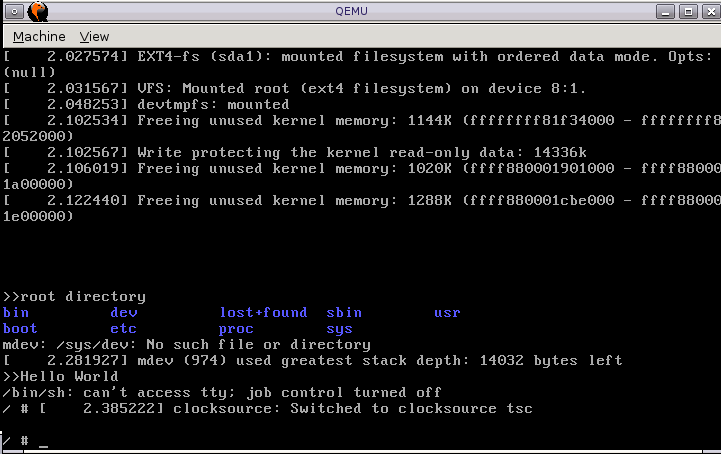
>>root directory
bin dev lost+found sbin usr
boot etc proc sys
>>Hello World
/bin/sh: cant access tty; job control turned off
/ #Again, sometimes we get a kernel panic from nasty APIC stuff. We can shutoff APIC with a command line option that qemu will pass thru to the kernel.
qemu-system-x86_64 -kernel bzImage -initrd initramfs.cpio -m 512 \
-hda disk.img -nographic -append "console=ttyS0 noapic" The kernel can also boot directly off a hard disk without initramfs. For this we will need to install a bootloader on the virtual disk. I looked at using GRUB and LILO but did not find a lot of information on installing them on virtual disks. It looked like you need to create a chroot environment to install them correctly. So, I took the easy way out and decided to use SYSLINUX instead (actually the extlinux version of SYSLINUX).
Overall the process will be to:
Instead of starting from scratch creating the virtual disk, lets copy the disk file from exercise #2 and add the kernel image to it.
$ cd $HOME/tiny
$ mkdir exercise3
$ cp ../exercise2/bzImage .
$ cp ../disk.img .
$ mkdir mnt
$ su -
# mount -t ext4 -o loop -o offset=$((512*2048)) disk.img mnt
# # ll mnt/
    total 26K
    drwxr-xr-x 2 root 3.0K Jan 21 13:54 bin/
    drwxr-xr-x 2 root 1.0K Jan 21 13:54 boot/
    drwxr-xr-x 7 root 3.0K Jan 23 08:16 dev/
    drwxr-xr-x 3 root 1.0K Jan 21 13:54 etc/
    drwx------ 2 root  12K Jan 21 13:20 lost+found/
    drwxr-xr-x 2 root 1.0K Jan 21 13:54 proc/
    drwxr-xr-x 2 root 3.0K Jan 21 13:54 sbin/
    drwxr-xr-x 2 root 1.0K Jan 21 13:54 sys/
    drwxr-xr-x 4 root 1.0K Jan 21 13:54 usr/
# cp bzImage mnt/boot/
# umount mntNext, we need to install stage1 bootloader onto the master boot record. In my case Slackware comes with syslinux installed so I just had to copy the Master Boot Record "MBR" code to my working directory and dd it onto the disk image. Notice in this case we setup the loop device to the start of the disk file and not the start of the first partition.
$ cp /usr/share/syslinux/mbr.bin .
$ su -
# losetup /dev/loop0 disk.img
# dd if=mbr.bin of=/dev/loop0
    0+1 records in
    0+1 records out
    440 bytes copied, 0.00270004 s, 163 kB/s
# losetup -d /dev/loop0
The last thing we need to do is create a configuration file for extlinux and install it on the virtual disk.
$ vim extlinux.conf
    PROMPT 1
    TIMEOUT 50
    DEFAULT lucy

    MENU TITLE Lucy Boot Menu

    LABEL lucy
        MENU LABLE Lucy Linux
        LINUX ../bzImage
        APPEND root=/dev/sda1 rw

$ su -
# mount -t ext4 -o loop -o offset=$((512*2048)) disk.img mnt
# mkdir mnt/boot/extlinux/
# cp extlinux.conf mnt/boot/extlinux
# cd mnt/
# extlinux --install boot/extlinux/
    boot/extlinux/ is device /dev/loop0
    Warning: unable to obtain device geometry (defaulting to 64 heads, 32 sectors)
             (on hard disks, this is usually harmless.)
# cd ..
# umount mntTo run the system:
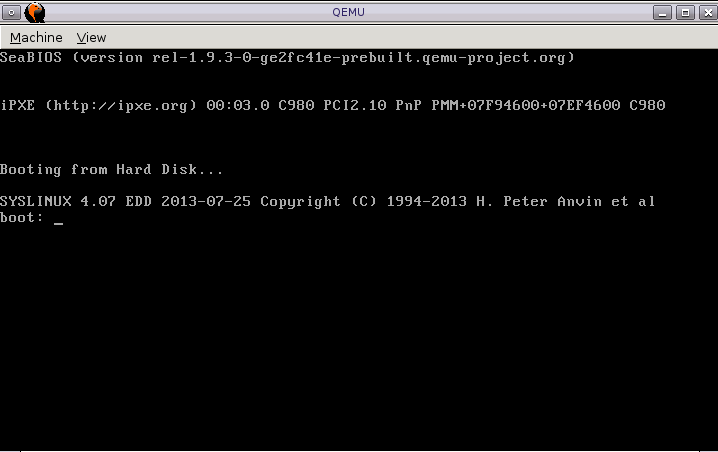
$ qemu-system-x86_64 -hda disk.img
or
$ qemu-system-x86_64 -drive file=disk.img,format=rawFirst the system comes up to the boot screen. You can hit enter or wait for it to continue.
After the boot you reach the root prompt, where we still have some job control issues to deal with.